What is Pass-Thru programming?
If you’re trying to program a module, there are two methods. One is pass-through and the other is using the Tech 2 as a go-between.
Pass-thru programming allows the scan tool to remain connected to the terminal and to the vehicle throughout the programming process. The vehicle must be in close proximity to the terminal while using pass-thru programming
IMPORTANT: TIS2000 supports Service Programming with the Tech 2 scan tool only
Note: Tech2 pass-through or go-between Method:
How to do Pass-Thru Programming with TIS2000?
- Launch TIS2000.
- From the TIS2000 main screen, select the Service Programming System icon.
- At the Select Diagnostic Tool and Programming Process screen:
- Select Pass-Thru under “Select Diagnostic Tool.”
- Under “Select Programming Process,” select Reprogram ECU or Replace and Program ECU,
depending on whether you are reprogramming an existing module or replacing a module.
- Under “Select ECU Location,” select Vehicle or Off Board Programming Adapter (OBPA), depending
on whether you are performing on-vehicle or off-board programming.
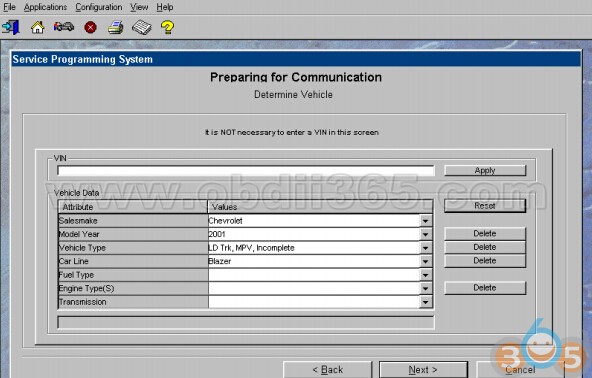
- At the Preparing for Communication “Determine Vehicle” screen, complete all terminal directed data until Next is highlighted (vehicle data will vary). Select Next.
IMPORTANT: In order to reduce the potential for signal loss, the RS-232 cable should not be more than 25 feet long.
- Follow the instructions on the Preparing for Communication screen, then select Next.
- Verify the VIN at the Validate Vehicle Identification Number (VIN) screen. Select Next.
If the option screen appears: Enter all information, then select Next.
IMPORTANT: If the vehicle identification number (VIN) does not appear correctly, the correct VIN must be entered.
- At the Supported Controllers screen:
- Select the appropriate control module under “Select Controller,” e.g. PCM/VCM Powertrain/Vehicle
Control Module. Options available in the Select Controller box will vary depending upon the VIN
number entered at the previous screen.
- Select the appropriate programming type (Normal, VCI, or Reconfigure).
- Select Next.
IMPORTANT: When selecting the vehicle configuration index (VCI) programming type, a valid VCI number for the vehicle must be entered. This number may be obtained from the Techline Customer Support Center. The correct tire size and axle ratio must be highlighted and a valid VCI number entered if you select Reconfigure for your programming type. Select Cancel if you receive a message stating that the calibration selected is already the current calibration in the control module and reprogramming with the same download is not allowed.
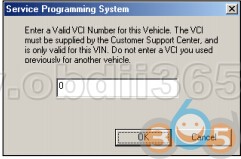
- If you select VCI for your programming type, the VCI number entry box appears.
Enter a valid VCI number for this vehicle (obtained from Customer Support) and select OK.
- If you select Reconfigure for your programming type, the Reconfigure box appears.
Select the correct tire size and axle ratio, then select OK. The VCI number entry box appears. Enter a valid VCI number for this vehicle and select OK.
- At the Calibration Selection screen:
- Select the appropriate calibration(s).
- Make sure all folder tabs have a green check mark.
- Select Next.
- At the Summary screen:
- Verify current calibration(s) with selected calibration(s).
- Select Next.
IMPORTANT: Some vehicles will require that Idle Learn, TP Learn, Theft Deterrent Relearn, or Crankshaft Variation Learn procedures be performed after programming. Consult the appropriate service information for these procedures
- If calibrations are the same, the NAODRUI Control box will appear. Select OK.
- On model year 1996 and newer controllers, a Crankshaft Position notice may appear under “Controller Specific Instructions” on the Program Controller screen. Select OK.
- The Transfer Data screen appears as reprogramming begins, finishing when the percentage bar reaches 100 per cent. This may take up to 30 minutes.
- The Program Controller “Programming Complete” screen appears. Select Close. The program will return to the TIS2000 main screen. Be sure to verify successful reprogramming.
- Turn off the GM tech 2 scanner.
- Disconnect the Tech 2 from the vehicle.