The RCA Cambio (…Only $110.00 on Amazon) has a (6) Hour Battery Life and is Very Lightweight… with a VERY Small Foot Print that will allow it to sit on the Center Console or be rotated into a Tall Rectangle for ease of Touch Screen use inside the Cab. Also… it is nice because all of the other Windows 10 Apps still function and you can Install HP Tuners (The Latest Blue Tooth Version) on the same Tablet with plenty of room to spare for easy Data-Logging.
The RCA Cambio has both the Touch Screen and Wide Touch Mouse Pad options built into the included Magnetic removable QWERTY Keyboard that sports NICE BIG Keys and is nice and crisp when typing. The Screen quality …even at 1280 X 800 Pixels is Clear and Bright.
This solution for Direct CD Installation should work on ANY Windows 10 Computer that supports the (32) Bit Operating System as a Fresh Installation.
How To Install TIS2000 on an RCA Cambio Tablet 10.1”
Procedure (Windows 10 (32) Bit Operating System ):
(1) This Technique will NOT work on ANY of the 64 Bit Flavor Windows 10 Computers.
(2) Visit the Link Below and Follow the Instructions, On Screen Prompts and Screen Prints to Wake Up the Native (16) Bit Capabilities of Windows 10:
(3) Reboot the Tablet and Turn Off the WIFI, Firewall and Anti-Virus Apps.
(4) Use a Rioddas Standard USB External DVD Burner to Install the (3) TIS2000 Disks (NO PS Required). The RCA Cambio comes with One Standard Size 3.0 USB Port on the Side Plane.The Rioddas Unit is SWEET and STABLE.
(5) Use the Latest Flavor of TIS2000 (3) Disk Set of Installation CDs. Note that during the Final Disc Install… the 3rd Mini-Disk has a Properly Working Dongle Crack available as a single .DLL File to Copy/Transfer to the cosids/bin sub-directory. Rename the Old .DLL before doing this.
(6) Reboot the Machine and then, after turning on the WIFI, Firewall and Anti-Virus Programs, Select the TIS2000 Icon from the Desktop and put the App through its Paces to ensure that the SPS Program Functions properly… without any AV or FW interruptions that might harm the Tech 2 Hand Held Scanner. A GOOD USB to Serial Port Adapter WILL be required.
(7) That’s all there is to it… No Complicated VMWARE… No Weird ‘Windows Magic’… and No Entanglements. It is just a Direct CD Installation using the Hidden (16) Bit Drivers Native to the Windows 10 (32) Bit Edition to coax things along.
Hey guys, obdii365.com engineer & users share the working solution to GM Tech2 software TIS2000error” E666: Access to Service Programming Server was denied”.
Possible reasons and solutions:
You need a New-Different “Safe” cable if you using USB —->RS232…..
Ensure the cable is a rs-232 and not a rs232c.
Look at the following rs232 adapter, it is high quality made, which is included in the package.
2: To set COM port as COM1. —> under CONFIGURATION>I/O MANAGEMENT>TECH2>PROPERTIES. Note: Please do not use usb—rs232 (converter), it is useless.
Normal TIS2000 software that comes with it requires an individual USB security dongle, (most dongle in the kit is useless).Go figure. TIS2000 is COM yet the security is USB. This REALLY screws up things sometimes.If you do need the dongle and don’t have one, it will come with error E666.
Look at USB security dongle:
For GM Opel tis2000: use D630 computer, you can insert the USB dongle to use or use the patch to crack.
For Saab TIS2000: usually use IBM T30, for other computer you may get error message, need to insert the USB dongle, can’t use the patch to crack.
This will allow you to program and update controllers up to 2008 on most GM family vehicles. On the good side, you can use TIS2000 as well as TIS on WEB in both pass thru mode, as well as remote mode if your PC is not close to the car your working on. TIS2000 can also be configured to use a J tool in pass thru meaning if you were to acquire a J2534 unit or an MDI down the road, you can configure TIS2000 to work directly in concert with it. Another benefit to using TIS2000, even WITH a subscription to TIS on WEB is that TIS on WEB is no longer supporting VTD re-learning on a lot of pre CAN products. Its worth its salt just for that feature alone. TIS2000 allows you to use your Tech 2 as a pass thru unit and you would have the flashes resident to your PC. You do not need to have internet access to flash program cars from TIS2000. This is all upside!
Downside is that TIS2000 is not known to play nice with Windows OS beyond windows XP. It also does not work on a solid state hard drives or memory devices. It has to be a good fashioned platter drive. It takes up a good amount of HD space as well (as much as 4GB).
If you can believe it, OTC actually provided programming software to allow an OTC Genisys, Mentor, Taskmaster, Deturminator to do programming on ALL GM modules in Pre O8. As a matter of fact, the data disc updates are directly from GM and work with TIS2000 software to update it. The only catch is that you need to have the TIS2000 program installation disc and a software security key to make it work on a PC.
I have personally posted TIS2000 discs and security keys on auction sites and the feedback I get on how well it works is outstanding as to its usefulness and functionality.
For some newer vehicles, as new as 2007 (caddy’s and W body cars in particular), they love to tell you to go blow when it comes to pass-thru programming or even using a remote mode of programming with MDI, Tech 2 or generic J 2534 units. Believe it or not, I have had to use gm Tech 2 Legacy feature to get into some of these modules.
Yea, yea, it all sounds kinda overwhelming, but trust me, its all there, you just have to know what it means when you’re looking at it. Once you know where its at, you will know when its time to use it.
PC Selection for GM programming:
Now that Microsoft no longer supports Windows XP, lots of folks have moved away from XP as an OS. If you want to continue to use programs like TIS2000, better think it over before re-formatting your PC.
Windows XP:
I personally, use a Toughbook CF19 with windows XP on a platter drive specifically for the purpose of working with GM products. Its a little more expensive than the CF18’s or CF24’s that most folks use because they are much cheaper. The only reason I use CF19 is because it has SATA hard drive capabilities. The wonderful thing about Toughbook is that it has a removable hard drive caddy in the side. You can slide the hard drive, hard drive heater and caddy out in seconds, and slip in another unit with whatever load of windows you like. Personally, I have one platter drive equipped caddy with all my GM software using Windows XP. When I need some other application like Ford IDS, or Chrysler witech, or Honda HDS, I simply pop the GM HD out of my PC and slip in a Solid State HD with Windows 7 in and fire it up. Some folks are astonished that Windows 7 will work well on such a Puny processor, but with a little added RAM, (4 Gig total) and a SSHD, it works great! If your already using windows 7 on a platter drive, you can easily install a virtual windows XP onto it. There is actually a feature within windows 7 to do just that.
MacOS:
Afraid of an Apple Mac Book for programming? Think again! It may be the best unit out there!
I also like to use my MacBook Pro and a program called parallels to run OS10 for general computing, than I can do the 2 finger slide into windows 7 and 2 finger side into XP as I need to. I do not need to close down a virtual machine like Windows requires you to do when you want to toggle between multiple operating systems. You simply put two fingers on the mouse pad and SSSLLLLLIIIIIDDDDDEEEEE to whatever OS you want to use. Parallels shares the USB ports and wireless, so there is no loss of connectivity or functionality. Truth be told, MacBook is FAR superior to PC even with a windows OS on it. You can also use programs like Virtual Box on MacBook to jump from Apple OS10 to Whatever windows OS you like, but I find parallels to be far more user friendly and light years faster! I have not even broached Linux operating systems like Ubuntu which also work great with some of this software and are just incredibly fast!
Smart phone:
Connecting to the Internet……PICK UP THE PHONE!!!!!!!!
The last thing I want to discuss is how you can use your smart phone to connect your PC to the net to get on GM TIS ON WEB. Sure, you can make most smart phones like I phone and Android an internet “hot spot” BUT…..This is slow, and insecure! I prefer to use a cell phone app called “PDA NET.” This allows me to tether my cell phone directly to my PC through USB and gives me lightning fast internet service. The trial app can be had for free, but I’m telling you, spend the eight bucks to buy the app. Its way better, has far more features and folks, if you use this one single time to update a controller, it will more than pay for itself!
Finally, bear in mind, I am by no means a computer expert/geek! I am nominal in skill level at best! I rely on the kindness of others to show me the way. This is why our always welcome to reach out with questions.
If you’re trying to program a module, there are two methods. One is pass-through and the other is using the Tech 2 as a go-between.
Pass-thru programming allows the scan tool to remain connected to the terminal and to the vehicle throughout the programming process. The vehicle must be in close proximity to the terminal while using pass-thru programming
IMPORTANT: TIS2000 supports Service Programming with the Tech 2 scan tool only
From the TIS2000 main screen, select the Service Programming System icon.
At the Select Diagnostic Tool and Programming Process screen:
Select Pass-Thru under “Select Diagnostic Tool.”
Under “Select Programming Process,” select Reprogram ECU or Replace and Program ECU,
depending on whether you are reprogramming an existing module or replacing a module.
Under “Select ECU Location,” select Vehicle or Off Board Programming Adapter (OBPA), depending
on whether you are performing on-vehicle or off-board programming.
Select Next
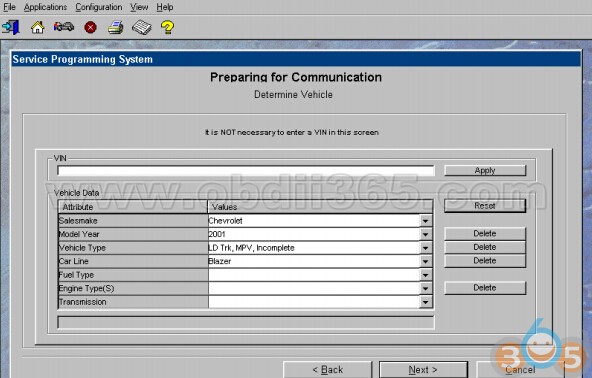
At the Preparing for Communication “Determine Vehicle” screen, complete all terminal directed data until Next is highlighted (vehicle data will vary). Select Next.
IMPORTANT: In order to reduce the potential for signal loss, the RS-232 cable should not be more than 25 feet long.
Follow the instructions on the Preparing for Communication screen, then select Next.
Verify the VIN at the Validate Vehicle Identification Number (VIN) screen. Select Next.
If the option screen appears: Enter all information, then select Next.
IMPORTANT: If the vehicle identification number (VIN) does not appear correctly, the correct VIN must be entered.
At the Supported Controllers screen:
Select the appropriate control module under “Select Controller,” e.g. PCM/VCM Powertrain/Vehicle
Control Module. Options available in the Select Controller box will vary depending upon the VIN
number entered at the previous screen.
Select the appropriate programming type (Normal, VCI, or Reconfigure).
Select Next.
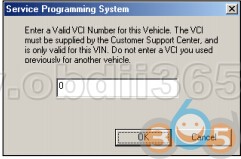
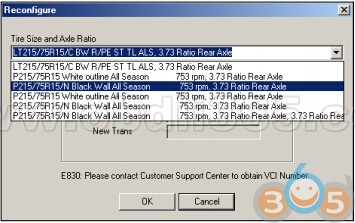
IMPORTANT: When selecting the vehicle configuration index (VCI) programming type, a valid VCI number for the vehicle must be entered. This number may be obtained from the Techline Customer Support Center. The correct tire size and axle ratio must be highlighted and a valid VCI number entered if you select Reconfigure for your programming type. Select Cancel if you receive a message stating that the calibration selected is already the current calibration in the control module and reprogramming with the same download is not allowed.
If you select VCI for your programming type, the VCI number entry box appears.
Enter a valid VCI number for this vehicle (obtained from Customer Support) and select OK.
If you select Reconfigure for your programming type, the Reconfigure box appears.
Select the correct tire size and axle ratio, then select OK. The VCI number entry box appears. Enter a valid VCI number for this vehicle and select OK.
At the Calibration Selection screen:
Select the appropriate calibration(s).
Make sure all folder tabs have a green check mark.
Select Next.
At the Summary screen:
Verify current calibration(s) with selected calibration(s).
Select Next.
IMPORTANT: Some vehicles will require that Idle Learn, TP Learn, Theft Deterrent Relearn, or Crankshaft Variation Learn procedures be performed after programming. Consult the appropriate service information for these procedures
If calibrations are the same, the NAODRUI Control box will appear. Select OK.
On model year 1996 and newer controllers, a Crankshaft Position notice may appear under “Controller Specific Instructions” on the Program Controller screen. Select OK.
The Transfer Data screen appears as reprogramming begins, finishing when the percentage bar reaches 100 per cent. This may take up to 30 minutes.
The Program Controller “Programming Complete” screen appears. Select Close. The program will return to the TIS2000 main screen. Be sure to verify successful reprogramming.